Right now lots of delicious things are evolving in the kitchen, good but not just-so, heady scents lacking texture...beer bread that rises yet is brick-ish, too sweet dark beer chocolate cake, biscuit style one vs biscuit style two, chocolate mousse resembling a melted milk shake that churns into a decent ice cream, cherry marmalade epic fail via operator error. Eventually they'll all be ready to share, just not yet.
It is a bit discouraging when a string of recipes don't come together perfectly on the first, or even third, attempt. The fun of playing in the kitchen fading, making it time to bake a no-fail treat. This means an old standard or anything ever tried from David Lebovitz. Today, it might mean both.
Starting with these Baci di Dama cookies - hazelnut with a kiss of chocolate on David Lebovitz's blog.
http://www.davidlebovitz.com/2012/11/baci-di-dama-cookies-recipe/
And some simple savory cooking, like sausage & lentil stew.
Thursday, November 29, 2012
Monday, November 19, 2012
My Favorite Pots & Pans are on Sale this Saturday
Celebrity pans are ubiquitous, expensive, and unnecessary. Nameless, heavy bottom stainless steel pans populate both professional and civilian kitchens. As do anodized aluminum. Long ago I worked retail and managed to buy most of my Calphalon pots & pans on sale, plus an additional 40% off employee discount. At the time Calphalon was made in Ohio, and one of the very few pots & pans that were oven & stove-top safe. Which in my mind meant less stuff in my tiny kitchen, less to clean up after a meal, and with the warranty something I would buy once in my life. They’re decades old now, and only a couple have ever merited shipping back for replacement. Lifetime Warranties are a beautiful thing, but perhaps not a necessary thing.
If I had to restock a kitchen now, without working-in-retail-discounts and sales, I’d head straight for Ikea.
Ikea can be a hit or miss. For me their 365+ white dishes are a hit. After spending a winter cooking on a set I can’t rave enough about their 365+ plain, stainless cookware. The sauce pans even have measurements engraved onto the interior pan wall, removing the guess work when gauging reductions, making adding fluids a snap. A 15 year warranty isn’t a slouch either. The wide, hollow handles are solidly attached, comfortable, and oven safe. The plain stainless is also incredibly easy to clean and maintain.
Even better, for Black Friday Weekend (Saturday November 24th) Ikea has their 7 piece starter set on sale for $19.99, usually $49.99. Only the sauté pan is Teflon coated, which is convenient for making pancakes, crepes, and other delicate foods or caramelizing pineapple. The 5qt pot & lid works well as a small dutch oven; the 3qt pot and lid makes risottos, soups; the 1qt is perfect for reductions, water baths, soup for one, rice for two. One set provides all the basic pots, pans and lids to stock a kitchen capable of cooking all the recipes here. Two sets will accommodate cooking for a crowd, like during the holidays, and still cost less than a regular price single set.
http://ikea.shoplocal.com/IKEA/BrowseByPage?storeid=2628487&promotionviewmode=2&promotioncode=Ikea-121112&listingid=0&sneakpeek=N
Add in the 11qt dutch oven/stock pot on sale for $29.99 for big batches of pasta sauce, large roasts, canning, mulled wine, etc.
As much as I loath crowds, this is one time it is worth braving the madness. $50-$70 to completely stock a kitchen in good, versatile pans…Sold.
Saturday, November 17, 2012
Pear Brandy & Apple Brandy
Fruited Brandies are wonderfully simple to make and cost far less than flavored brandies in the liquor store. Unless the funds are available to buy Calvados or other well-known brandies the cheaper varieties can be contaminated with corn alcohol, corn syrup or imitation flavor of unknown origin.
For 2013, wish me good health, so I can return to making gallons of crabapple brandy, apple pie brandy, and plum spiced brandy as Yule Gifts.
 |
| everything necessary to make fruited brandies at home |
Crapabble brandy being my absolute favorite, even over peach brandy. The taste is quintessential apple pie packed into a thimble-size glass. Plus crabapples are often free for the picking. This year when the crabapples ripened I was too sick to take advantage of the tree’s bounty. Which means my cupboard is bare of fruited brandies, and winter is coming. This is unacceptable, untenable. So while I was brandy poaching a couple pears I started a pint jar of pear brandy, and another of apple brandy.
Making fruited brandies is one of my favorite uses for old, crystallized honey. I scoop it into the jars first, add the spice, fruits and then top with brandy. With swirling, over the infusion time, the honey dissolves. No waste, and no sticky dribbles down the jar sides.
Follow a vegan diet? Agave works in place of honey. I've used both in different batches with success.
For 2013, wish me good health, so I can return to making gallons of crabapple brandy, apple pie brandy, and plum spiced brandy as Yule Gifts.
Pear Brandy
2” cinnamon stick
Pinch of nutmeg
1 oz of honey
Brandy – inexpensive like Korbel
Directions
Stem, core and slice pear into sixths, leaving the peel on. Place in pint mason jar with other ingredients and cover with brandy.
Ingredients
1 medium sized, ripe pear, such as Bosc or Bartlett
2 cloves2” cinnamon stick
Pinch of nutmeg
1 oz of honey
Brandy – inexpensive like Korbel
Directions
Stem, core and slice pear into sixths, leaving the peel on. Place in pint mason jar with other ingredients and cover with brandy.
Swirl 2-4xday for the first week, then daily for another week. Let rest in a cool, dark place for another two weeks minimum, two months preferably.
Strain and pour liquid back into the jar. Use in pies, tarts, or as an aperitif. I keep some of the fruit in my freezer to mince and use a dollop of to season those same pies and tarts.
Apple Brandy
Ingredients
Directions
Swirl 2-4xday for the first week, then daily for another week. Let rest in a cool, dark place for another two weeks minimum, two months preferably.
Strain and pour liquid back into the jar. Use in pies, tarts, or as an aperitif.
Ingredients
1 small, tart apple, such as Granny Smith or Crabapple
1 sliver of lemon zest if using non-crabapples
4 cloves
2” cinnamon stick
¼ tsp mace
Pinch of nutmeg
2 oz of honey
Brandy – inexpensive like Korbel
Stem, core and slice apple into sixths, leaving the peel on. Place in pint mason jar with other ingredients and cover with brandy. When unable to use crabapples I add a strip of lemon zest to boost the tartness.
Swirl 2-4xday for the first week, then daily for another week. Let rest in a cool, dark place for another two weeks minimum, two months preferably.
Thursday, November 15, 2012
Man Catcher Brownies
There is a long tradition of handy single men doing projects in exchange for food. In my case, specifically of barn roof’s being repaired, paddock fences mended, and hay moved for fresh baked brownies and lemonade. Since my teens the one bowl brownie recipe on the Baker’s© Chocolate was the go-to recipe for an excellent cake-y brownie.
Ingredients
8 oz / 227 grams coconut oil or palm shortening
5.86 oz / 167 grams dutched cocoa powder
5 eggs
4 tsp vanilla
9.42 oz / 267 grams light brown sugar
9.42 oz / 267 grams sugar
5.88 oz / 187 grams of Gluten-Free All-Purpose flour
2/3 tsp kosher sea salt
Directions
Preheat oven to 325 degrees. Line a 9x9 pan with parchment paper.
In a small bowl whisk together the flour and salt until no lumps remain.
In a medium bowl heat the coconut oil until just melted. Immediately whisk in cocoa powder until smooth. Let cool. Don’t give into the visual temptation to lick the whisk…straight fat & cocoa will be an unpleasant junior high Home Economics flashback.
In the largest bowl, while the cocoa mixture cools, whisk eggs together and add in sugars. Then whisk in the vanilla. Stir in cooled cocoa mixture. Now the whisk is perfect to swipe a dab from…sticky with sweet, intense chocolaty goodness.
Fold flour and sea salt into wet mixture until just mixed…hand mixing these is the easiest route to not to over-mixing and ending up with rubbery, tough brownies. The dough is thick. It won’t spread while baking, so push it into the pan corners and level all over with the mixing spatula.
Bake 40-45 minutes or until a crust forms and toothpick comes out mostly clean. Completely clean will be an over baked brick.
Cool in pan for 10 minutes. Then it is safe to lift the parchment out of the pan and divvy up warm brownie bliss.
 |
| Three Bowls to create Brownie Bliss |
Then in 2007 I read a Boulder Daily Valentine’s article on Leigh Lambert and her quest for the perfect brownie, entitled Man Catcher Brownies. Given brownies caught guys for barn repairs and home maintenance tasks, the title had me giggling. Reading the recipe reminded me of my chocolate chip cookie recipe with equal parts sugar and brown sugar, a hefty slug of vanilla, the dash of salt. Then the mixing directions made mental connections…techniques elevate the results, so even so-so ingredients make a better brownie:
Mixing the cocoa into the melted fat releases more of the cocoa polyphenols maximizing the flavor.
Brown sugar enhances the caramel & bourbon notes…substituting vanilla infused bourbon for the vanilla extract is pretty tasty too; as is having a finger of bourbon with a warm brownie!
The large grains of kosher sea salt prevent too-sweet with piquancy in each bite.
Unless you’re buying generic store brand cocoa, higher-grade cocoa isn’t necessarily more expensive cocoa, and makes a tremendous difference. The higher grade will contain more cocoa butter fat, have a deeper color, and more phenols (chocolaty smell.) To a chocolate fiend the bigger, rounder, richer taste experience will be readily apparent. I keep a stock of Mama Ganache (Natural and Dutched), Penzey’s (High Fat), Savory (Midnight), Guittard (Rouge) or Scharffen Berger cocoa’s in my freezer.
Once you bite into these, dirtying three bowls will never seem like too much effort. Hand mixing them is still as simple as the old one-bowl recipe.
 |
| moist and dense with a crackle top |
8 oz / 227 grams coconut oil or palm shortening
5.86 oz / 167 grams dutched cocoa powder
5 eggs
4 tsp vanilla
9.42 oz / 267 grams light brown sugar
9.42 oz / 267 grams sugar
5.88 oz / 187 grams of Gluten-Free All-Purpose flour
2/3 tsp kosher sea salt
Directions
Preheat oven to 325 degrees. Line a 9x9 pan with parchment paper.
In a small bowl whisk together the flour and salt until no lumps remain.
In a medium bowl heat the coconut oil until just melted. Immediately whisk in cocoa powder until smooth. Let cool. Don’t give into the visual temptation to lick the whisk…straight fat & cocoa will be an unpleasant junior high Home Economics flashback.
In the largest bowl, while the cocoa mixture cools, whisk eggs together and add in sugars. Then whisk in the vanilla. Stir in cooled cocoa mixture. Now the whisk is perfect to swipe a dab from…sticky with sweet, intense chocolaty goodness.
Fold flour and sea salt into wet mixture until just mixed…hand mixing these is the easiest route to not to over-mixing and ending up with rubbery, tough brownies. The dough is thick. It won’t spread while baking, so push it into the pan corners and level all over with the mixing spatula.
Bake 40-45 minutes or until a crust forms and toothpick comes out mostly clean. Completely clean will be an over baked brick.
Cool in pan for 10 minutes. Then it is safe to lift the parchment out of the pan and divvy up warm brownie bliss.
Tuesday, November 13, 2012
Brandy Poached Pears
I’ve been craving brandy poached pears ever since Grace Burrowes latest heroine reminisced about eating brandy poached pears in childhood. Pears poached in red wine, orange juice and spices are robust; a winter staple, especially served with elk steak with more of the reduced sauce over vanilla ice cream for dessert. Brandy poached are entirely different…delicate and heady, a memory of late summer.
 |
| Soft Focus |
This week the small, locally owned grocer’s had red Anjou pears on sale…a lovely bin of fat, fragrant pears. Add in a windy, snowy, cold autumn day and these are the results.
The only problem…I used the last of my brandy! Will have to run out tomorrow for another bottle so I can have a small snifter with my bowl of poached pears…or open a bottle of Fre non-alocholic bubbly and eat the pears swimming in bubbles…or in reality, Both!
2 big, fat, ripe pears
6oz / 180ml brandy
6 oz / 180ml water
3-4 tbsp honey
1 tsp vanilla2” length of cinnamon stick (break a longer stick on the counter edge)
4 whole cloves
Nutmeg, freshly grated, 3-4 swipes aka not very much (optional)
Directions
Put the water, brandy, honey, vanilla, cinnamon stick, and cloves into a 1-1 ½ quart sauce pan on low-to-medium heat. I use my smallest burner, 5,000 btu.
While the sauce begins to heat, peel pears, core, quartering each half.
Place in sauce pan so all the slices are in the fluid. They don’t have to be completely covered.
 |
| Snifter o'Bliss |
Cover pan with lid, or a saucer (darn it, sometimes those wee sauce pans don’t come with lids) and poach for 15 minutes. Halfway through, gently shift the pears so the uncovered part are moved down into the fluid.
At 15 minutes, check for tenderness. Pears go from just-right to pear sauce in a blink…I like mine tender yet still solid. Remove the pears with a slotted spoon to serving dish. Turn the heat up to high and reduce the liquids to syrup. Down to about ¼ the volume. Add the bit of fresh nutmeg.
Pour over pears and serve immediately. If storing, cool the syrup in the pan. Once cool, spoon over pears in storage container and place in the fridge. Otherwise the hot syrup will cook the pears a bit more.

Sunday, November 11, 2012
'Tis the Season for Mixers & Food Processors
For an avid baker the two most expensive and necessary tools are a stand mixer and a food processor, making them the second and third 'expensive' priority after buying good knives. If you use the tips and guidelines in the October post in Tools, combined they will most likely cost more than the basic knives.
The stand mixer is invaluable for achieving breads and cakes with the desired crumb, texture, moisture level...that difficult alchemy without gluten’s elasticity. Creaming fat and sugar to ribbons or fluffy clouds. Turning egg whites into meringue without arms cramping up, and in no time flat. There is a reason many Americans grew up with their mother's beastly heavy, decades sturdy, white Kitchenaid workhorse holding pride of place in a counter corner…they perform and are hard to kill!
The food processor makes chopping nuts into meal/flour possible, and cheaper than store-bought nut flours. Smooth, flawless ganache a simple matter of pulsing a button. Ice creams, purees for fruit sorbets, all faster and less mess than any other preparation method. Cuisinart is currently doing a model change, with the 'old' styles at 50-66% of the usual retail price...
Each of these is a couple hundred dollars, or more, and worth every penny. Here are ways to find them at the best price possible.
http://www.shopkitchenaid.com/more-ways-to-shop-1/outlet-store-3/102020036/
There are also authorized refurb retailers online and in most outlet malls (Kitchen Collection to name one) who will have a different selection of colors & sizes. The online factory outlet is how I acquired my 6qt empire red mixer…partially funded by selling my decade old 5qt white mixer to a girlfriend wanting her first Kitchenaid on a budget. Another friend acquired hers via Craigslist at a divorce sale. Another has her grandma's hand-me down Kitchenaid; her only expense was having a repair shop oil & tune it up. A friend who is Thrift Queen found one for her daughter at a thrift store.
I'm comfortable advocating buying used or refurbished Kitchenaids & Cuisinarts because they are difficult to kill, easy to check before buying, and are often sold/discarded for reasons that have nothing to do with their functionality. Some people don't use them, received them as an unwanted gift, or like me upgrade to a large mixer or want a different color.
Testing a used unit before buying: plug it in, go thru the levels of speed, listen to it for clicks or grinds. Look at the bowl for dings indicating the beater needs adjusting. Or if a dime placed in the bowl doesn’t move when the mixer is turned on the beater needs adjusting down. To see how easy it is to adjust the beater, watch this video from KitchenaidTV:
https://www.youtube.com/watch?v=ocnETNExLc0
When Cuisinarts die usually the motor goes in a hot, smoking death, never to turn again. Easy to spot and simple to plug in to check. Does it turn on, without excess heat, smoke, or weird noises? Time to bargain!
A second stand mixer bowl is almost as valuable as the mixer itself. My second bowl is pretty much a dedicated egg white/meringue/whipped cream bowl. It saves precious time in recipes like the Regina de Notte Torte. For additional bowls, beaters, blades etc nothing beats the internet sources of Amazon and eBay. To spot over pricing on used opportunities, spend a bit of time rummaging the internet to be familiar with current prices.
Mixer and Processor acquired? Fantastic! You're ready for decades of seriously delicious baking...German chocolate cake & filling? Apricot brandy pound cake? Lavender chocolate truffles? Kona Inn banana bread? Shortbread? Fig Newtons? Pop over to recipes and get mixing!
The stand mixer is invaluable for achieving breads and cakes with the desired crumb, texture, moisture level...that difficult alchemy without gluten’s elasticity. Creaming fat and sugar to ribbons or fluffy clouds. Turning egg whites into meringue without arms cramping up, and in no time flat. There is a reason many Americans grew up with their mother's beastly heavy, decades sturdy, white Kitchenaid workhorse holding pride of place in a counter corner…they perform and are hard to kill!
The food processor makes chopping nuts into meal/flour possible, and cheaper than store-bought nut flours. Smooth, flawless ganache a simple matter of pulsing a button. Ice creams, purees for fruit sorbets, all faster and less mess than any other preparation method. Cuisinart is currently doing a model change, with the 'old' styles at 50-66% of the usual retail price...
Each of these is a couple hundred dollars, or more, and worth every penny. Here are ways to find them at the best price possible.
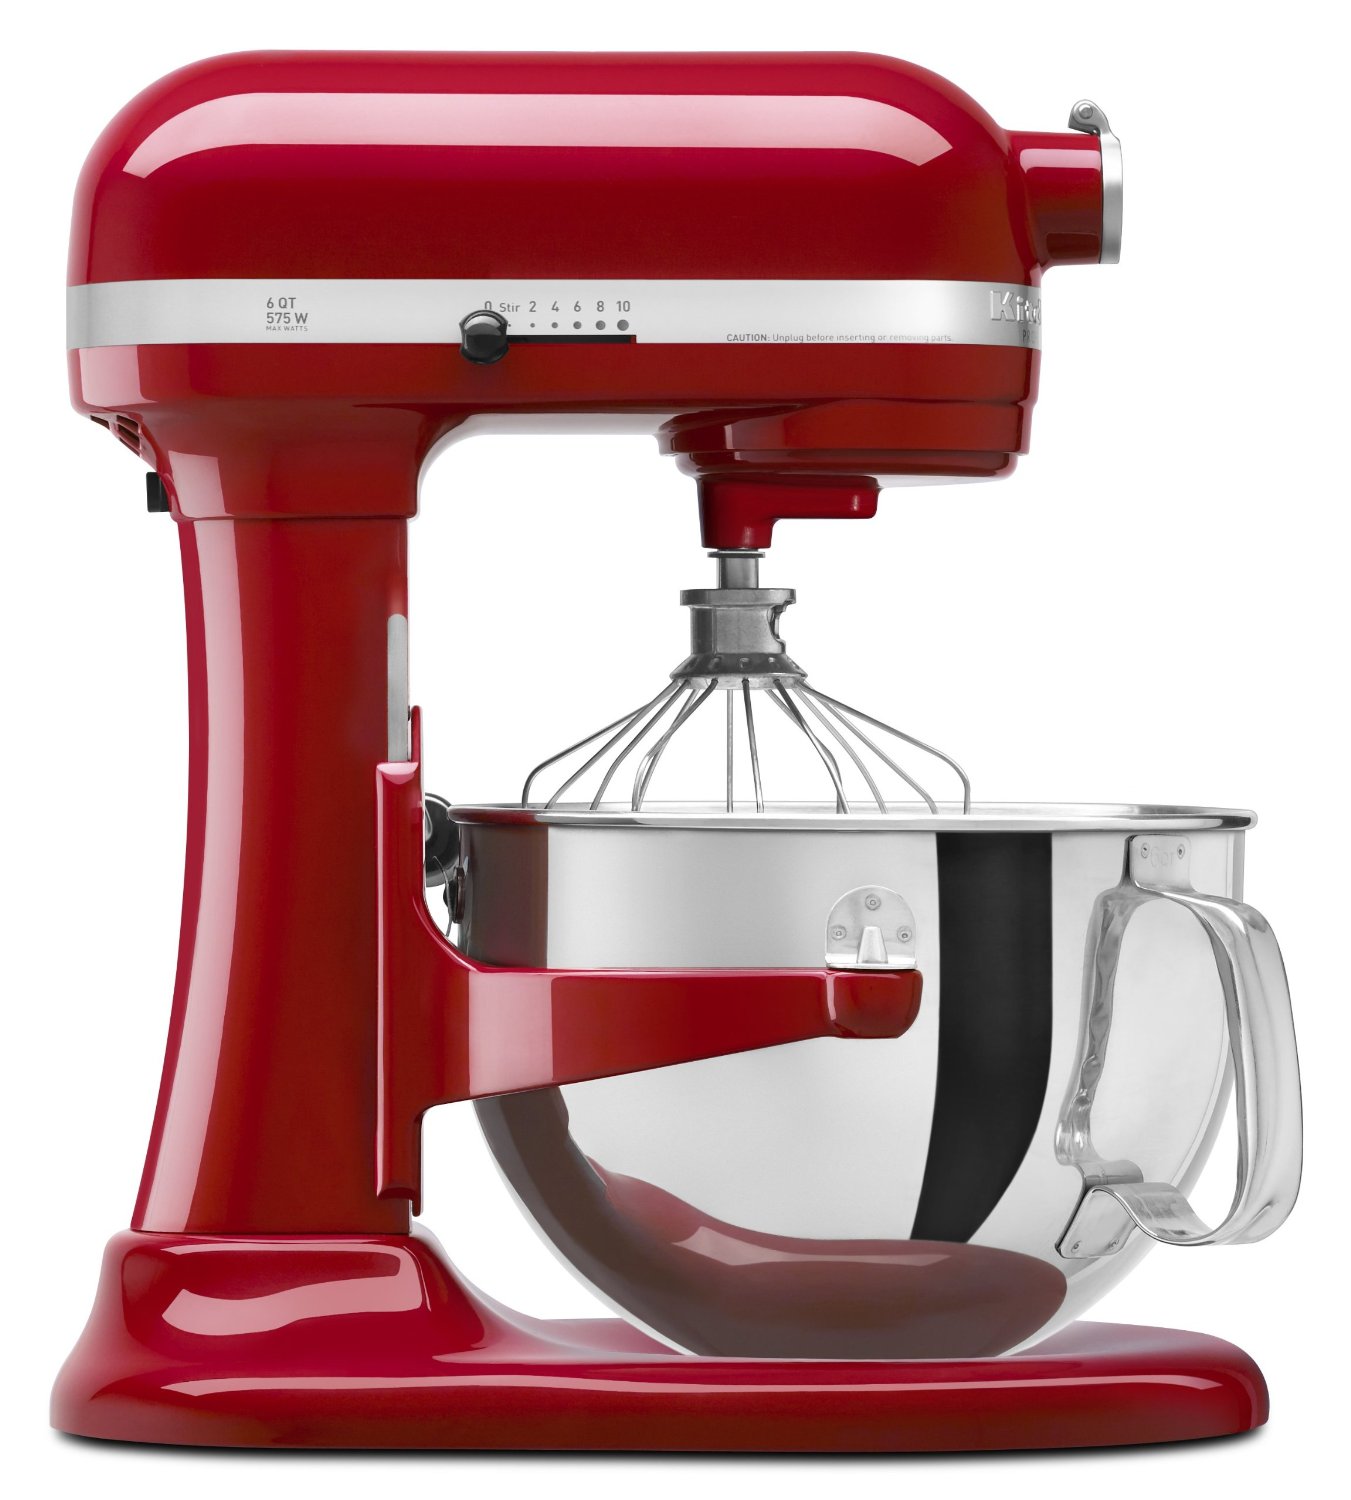 |
| Bowl-Lift 6 quart Mixer |
Costco and Sam's both carry Kitchenaid mixers and Cuisinart food processors in sizes that will accommodate almost every recipe found in baking books, for significantly less than mainstream, big box retailers or department stores. They tend to have better prices, plus sales and rebates, before major food-centric holidays (Thanksgiving, Christmas, Easter) and Mother's Day…which means right Now! As in an 11 cup processor for $149 or less.
Since the late 90s Kitchenaid has aggressively pursued becoming the most desired mixer in the US with a plethora of designer colors, three different sizes of bowls, two styles of mixer (beater-lift or bowl-lift). This increased production means they have an online outlet for factory refurbished units. Ones returned & repaired (rare), others that didn't pass the initial QC to leave the factory & had to be tweaked to be saleable, and are warrantied.
There are also authorized refurb retailers online and in most outlet malls (Kitchen Collection to name one) who will have a different selection of colors & sizes. The online factory outlet is how I acquired my 6qt empire red mixer…partially funded by selling my decade old 5qt white mixer to a girlfriend wanting her first Kitchenaid on a budget. Another friend acquired hers via Craigslist at a divorce sale. Another has her grandma's hand-me down Kitchenaid; her only expense was having a repair shop oil & tune it up. A friend who is Thrift Queen found one for her daughter at a thrift store.
I'm comfortable advocating buying used or refurbished Kitchenaids & Cuisinarts because they are difficult to kill, easy to check before buying, and are often sold/discarded for reasons that have nothing to do with their functionality. Some people don't use them, received them as an unwanted gift, or like me upgrade to a large mixer or want a different color.
Testing a used unit before buying: plug it in, go thru the levels of speed, listen to it for clicks or grinds. Look at the bowl for dings indicating the beater needs adjusting. Or if a dime placed in the bowl doesn’t move when the mixer is turned on the beater needs adjusting down. To see how easy it is to adjust the beater, watch this video from KitchenaidTV:
https://www.youtube.com/watch?v=ocnETNExLc0
When Cuisinarts die usually the motor goes in a hot, smoking death, never to turn again. Easy to spot and simple to plug in to check. Does it turn on, without excess heat, smoke, or weird noises? Time to bargain!
 |
| Beater-Lift 5 quart Mixer |
Mixer and Processor acquired? Fantastic! You're ready for decades of seriously delicious baking...German chocolate cake & filling? Apricot brandy pound cake? Lavender chocolate truffles? Kona Inn banana bread? Shortbread? Fig Newtons? Pop over to recipes and get mixing!
Friday, November 9, 2012
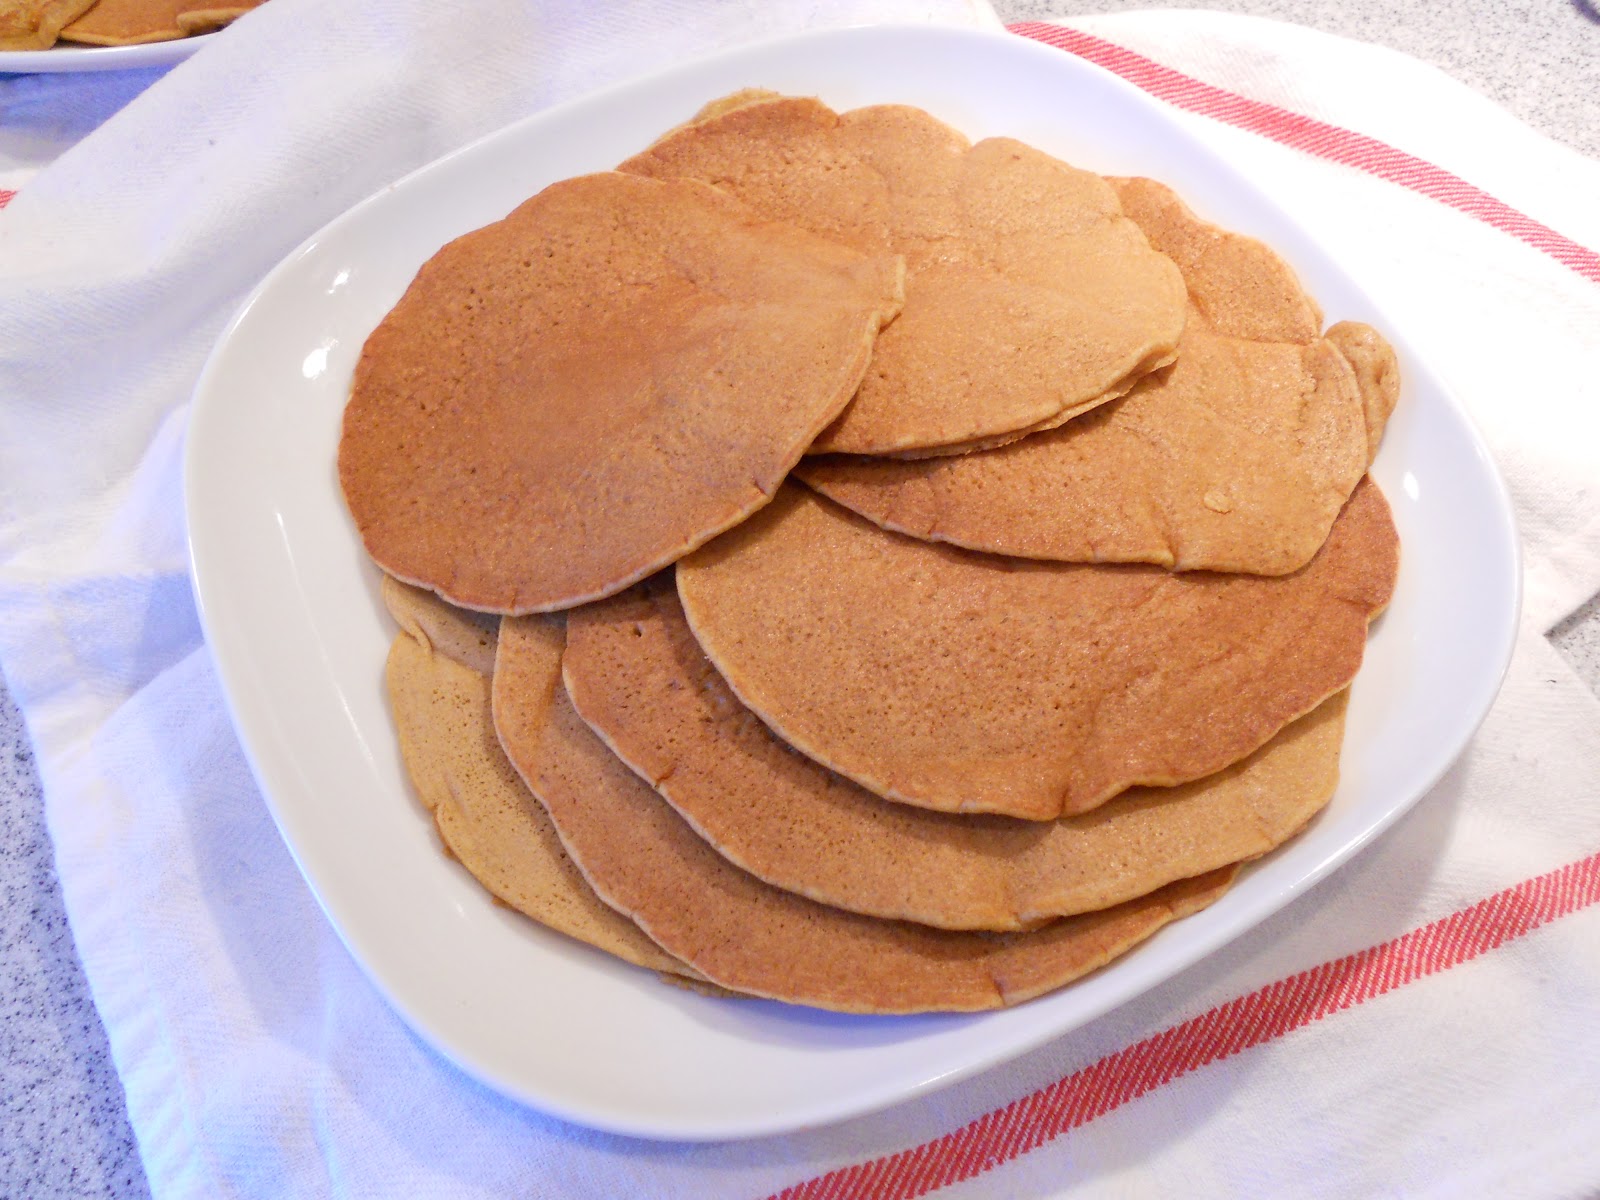
Pumpkin Pancakes & Waffles
For me, pumpkin takes pancakes and waffles from being too sweet to just right. Don't get me wrong, I still have a sweet tooth, but after more than a decade of no corn syrup laden food products, my sweet tooth is more of a rich-intense flavors tooth.
This makes about 16 or so 5" pancakes or individual waffles.
 Ingredients
7.4 oz / 210 grams Gluten-Free all purpose flour or brown rice flour
1/2 tsp salt
4 tsp pumpkin pie spice
4 large eggs
8 oz pumpkin puree
3.5 oz / 100 grams brown sugar (plain sugar works too)
2 oz vegetable oil
1 tsp vanilla
16 oz plain soy milk soured with 2 tsp lemon juice
 Directions
Usually I make these waffles all through autumn and winter, freezing the bulk of the batch for quick, hot breakfasts or snacks. Most often I eat them plain. On very cold mornings I'll add a dollop of maple syrup to my plate, then have extra strong tea or coffee to balance out the flavors.

7.4 oz / 210 grams Gluten-Free all purpose flour or brown rice flour
1 tbsp baking powder
1/2 tsp baking soda1/2 tsp salt
4 tsp pumpkin pie spice
4 large eggs
8 oz pumpkin puree
3.5 oz / 100 grams brown sugar (plain sugar works too)
2 oz vegetable oil
1 tsp vanilla
16 oz plain soy milk soured with 2 tsp lemon juice
 Directions
Whisk together the dry ingredients until blended. In a separate bowl whisk together the wet ingredients. Blend the two sets together until no lumps remain.
Pour 1/3 to 1/2 cup increments onto preheated griddle or into waffle iron. Cook until bubbles break in the center, then gently flip to cook the other side.
Freeze cooled extras between sheets of wax paper. To reheat, pop a pancake or waffle on a plate and microwave for about 45 seconds.
No pumkin pie spice on hand? Here is a quick way to blend your own:
 2 tsp cinnamon
 2 tsp cinnamon
1 tsp ginger
1/2 tsp nutmeg
1/4 tsp cloves
1/8 tsp anise (optional)
Sunday, November 4, 2012
Tortilla-less Chicken soup from Paleo Slow Cooking
Paleo Slow Cooking: Gluten Free Recipes Made Simple by Chrissy Gower caught my eye at the library...the Paleo diet is an excellent refuge for allergen free-food. The big, glossy images, clear directions, and generally short ingredient lists induced me to pick it up and try a couple recipes.

Tortilla-less Chicken Soup
1 medium yellow onion
4 celery stalks, chopped
3 carrots, chopped
2 garlic cloves, minced
1 jalapeno, diced
16 oz chicken broth
14.5 oz can diced tomatoes (I prefer fire-roasted for this recipe)
14.5 oz can of enchilada sauce (unavailable where I live, substituted a can of tomato sauce, a little can of diced green chilies, and a heaped tsp of Penzey's Taco Seasoning)
1 1/2 tsp each cumin & chili powder
1/2 cup coconut milk
1 rotisserie chicken (Whole Foods has one that is gluten-corn-dairy-soy free)
Directions
In a dutch oven over medium heat saute the carrots, onion, celery in a bit of olive oil until translucent.
Add the remaining ingredients to the pain, simmer for 20 minutes. While the sauce and veggies simmer, pull the rotisserie chicken apart & drop into the pan.
Ladle into bowls and serve with a sprinkle of cilantro. This makes 6-8 servings. Perfect for freezing a quart, lunch with a friend and then leftovers the next day...or feeding a hungry horde.
To prepare in a slow cooker: Saute the veggies, chunk 3-4 boneless-skinless chicken breasts or thighs, and add everything to the slow cooker. Cook for 8-10 hours on low.
Based on the success of this meal, I'm excited to try more recipes in this book. Highly recommend this book for folks who are new to cooking, don't enjoy cooking or don't have much time to spend cooking.
Before my food allergies manifested my slow cooker was a favorite kitchen tool, a bit of chopping, turn it on before leaving for work or school and come home to a fragrant home and ready meal. Yet all the recipes relied on condensed soups, cheese, cream, flour. So the big slow cooker was given away, and a small one entered the kitchen to make organic beans affordable again, because even organic canned beans often contain wheat flour, corn starch or "natural flavorings" of unknown origin.
One of the foods I miss in winter is a bowl tortilla soup full of chicken shreds swimming in a thick red sauce. It usually has kernels of corn, strips of tortillas, and corn starch thickener. So when I flipped to page 94 in the book and read Gower's note on turning this soup into a 20-30 minute stove-top quickie, I had to try it.

Tortilla-less Chicken Soup
1 medium yellow onion
4 celery stalks, chopped
3 carrots, chopped
2 garlic cloves, minced
1 jalapeno, diced
16 oz chicken broth
14.5 oz can diced tomatoes (I prefer fire-roasted for this recipe)
14.5 oz can of enchilada sauce (unavailable where I live, substituted a can of tomato sauce, a little can of diced green chilies, and a heaped tsp of Penzey's Taco Seasoning)
1 1/2 tsp each cumin & chili powder
1/2 cup coconut milk
1 rotisserie chicken (Whole Foods has one that is gluten-corn-dairy-soy free)
Directions
In a dutch oven over medium heat saute the carrots, onion, celery in a bit of olive oil until translucent.
Add the remaining ingredients to the pain, simmer for 20 minutes. While the sauce and veggies simmer, pull the rotisserie chicken apart & drop into the pan.
Ladle into bowls and serve with a sprinkle of cilantro. This makes 6-8 servings. Perfect for freezing a quart, lunch with a friend and then leftovers the next day...or feeding a hungry horde.
To prepare in a slow cooker: Saute the veggies, chunk 3-4 boneless-skinless chicken breasts or thighs, and add everything to the slow cooker. Cook for 8-10 hours on low.
Based on the success of this meal, I'm excited to try more recipes in this book. Highly recommend this book for folks who are new to cooking, don't enjoy cooking or don't have much time to spend cooking.
Subscribe to:
Posts (Atom)